

How to Floss with Braces in Westfield, IN
I know what you’re thinking…”I hardly floss WITHOUT braces, how in the world do I floss WITH them!?” But don’t worry, we have some tips and tricks that make it easy to keep your teeth squeaky clean, even with those braces, and it won’t feel like such a chore to do it. Keeping your teeth clean is ALWAYS important, but even more imperative during your orthodontic treatment. Read on to see some tips that will make your braces experience that much smoother, that’s what we’re here for!

Welcome again to the blog of your friendly neighborhood orthodontist in Westfield, IN—where we deliver high-touch, artistic, and intentional care to achieve not just good smiles, but WOW smiles. In this post you’ll find:
Why flossing with braces matters
What tools work best
A clear, step-by-step technique
Practical tips for your everyday routine
Why Flossing with Braces Matters
When you have braces, your brackets and wires introduce extra nooks and crannies where food, plaque, and bacteria can hide. According to Dr. Fiona Shi, a professional orthodontist in Kirkland, WA, consistent flossing with the right tools removes bacteria buildup and prevents white spots from forming around brackets. It would be a shame to spend all that time in braces to get the teeth and smile perfected, just to have white marks and cavities on the teeth in the end…
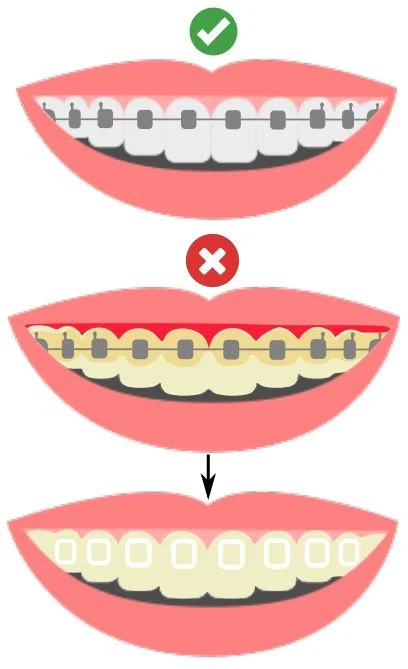
Let’s be clear: it is 100% possible to finish your orthodontic treatment without ANY white spots or cavities on the teeth! Having braces does not doom you to cavities. All it requires is a consistent, manageable hygiene routine and a little attention to detail.
Without proper brushing and flossing, you could face:
Prolonged treatment time
Gum inflammation (gingivitis)
Decalcification (white spots around brackets)
Cavities if the decalcification progresses
Stains or “shadowing” of your final smile
At our Westfield practice, we want your braces journey to lead to not just aligned teeth—but the beautiful, healthy smile you’ll be proud of forever!
The Best Tools for Flossing with Braces
Choosing the right tools makes all the difference in your flossing routine. Here’s what we recommend:
1. Classic: Waxed Floss with/without Floss Threader
Because of the brackets and wires, you want floss that won’t shred or snag. Waxed floss or dental tape (think “glide floss”) is ideal. A floss threader is a thin, floss-looking device that is a bit stiffer than floss (but still flexible) that helps you guide floss under the arch-wire and behind your braces. A floss threader isn’t imperative, but can be very helpful.
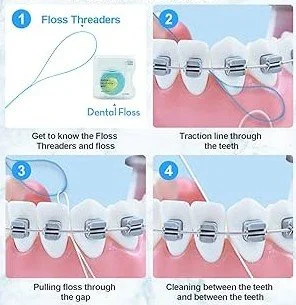
Step-by-step:
Get yourself about 18 inches of waxed floss or floss tape. Use a mirror so that you can see properly
Insert one end of the floss into the loop of the threader (if you’re using one)
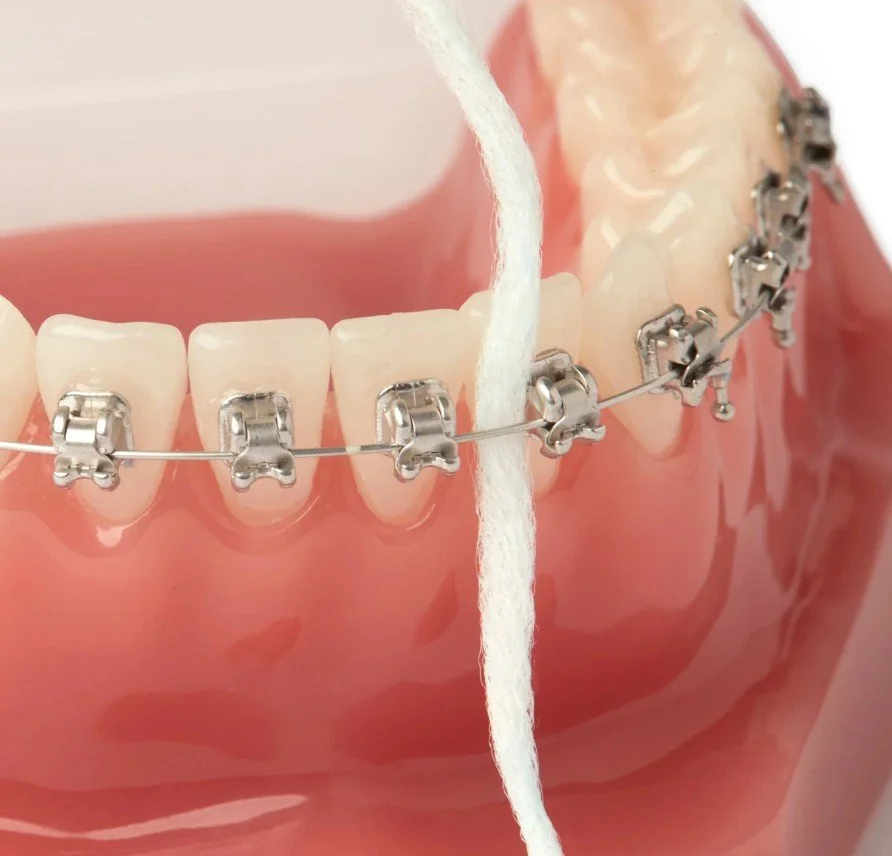
Pass the floss behind the wire, between the teeth and the wire (this is where the threader can be helpful)
Pull the floss through so that you can grab it on both ends and so that you have a clean length between the two teeth you’re working on
Wrap the two ends of the floss around your index fingers or thumbs for best control, holding about an inch of floss between your fingers
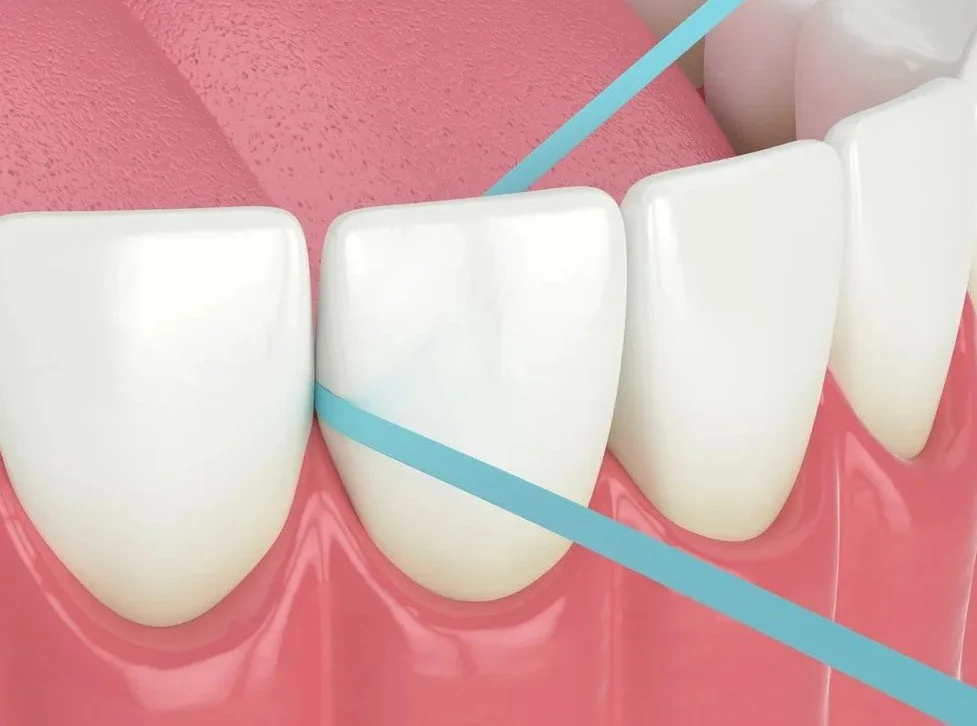
Snap the floss through the contacts of your teeth and make a “C” shape to better floss the contours of the teeth
Using gentle up-and-down motions, slide the floss along the side of the tooth under the gumline, continuing to use the C shape
Slide along the side of the tooth on the other side as well, using the same technique
Unthread/remove the floss from behind the wire, move it to the next contact, and repeat
*Make sure you floss both sides of each tooth (left and right of each tooth contact) for full coverage.
This is the classic method, and certainly works! But it will take some time, so make sure to allow yourself some extra time in your routine.
2. Newer & faster: Orthodontic-Friendly Flossers & Super-Floss
Superfloss is a pre-threaded or specially shaped piece of floss tools made for braces. It has 3 sections: a stiffer end that functions like a floss threader (from #1 above), a section of thicker spongy-type floss to help almost “brush” between the teeth, and then a section of regular waxed floss. This prevents you from having to use a floss threader each time and helps keep everything in order!
-Use this just like the method from #1 above, you just won’t need a threader (since there’s one built in).
Everyone is familiar with the small disposable flossers that help you get between your teeth, but not all are made for braces. There is a version that has a one part of the plastic “C” shape that is thinner than the other to allow it to slide easily under your wire. These can make things quicker and convenient! Just check first before you buy to see if it says “for braces.”
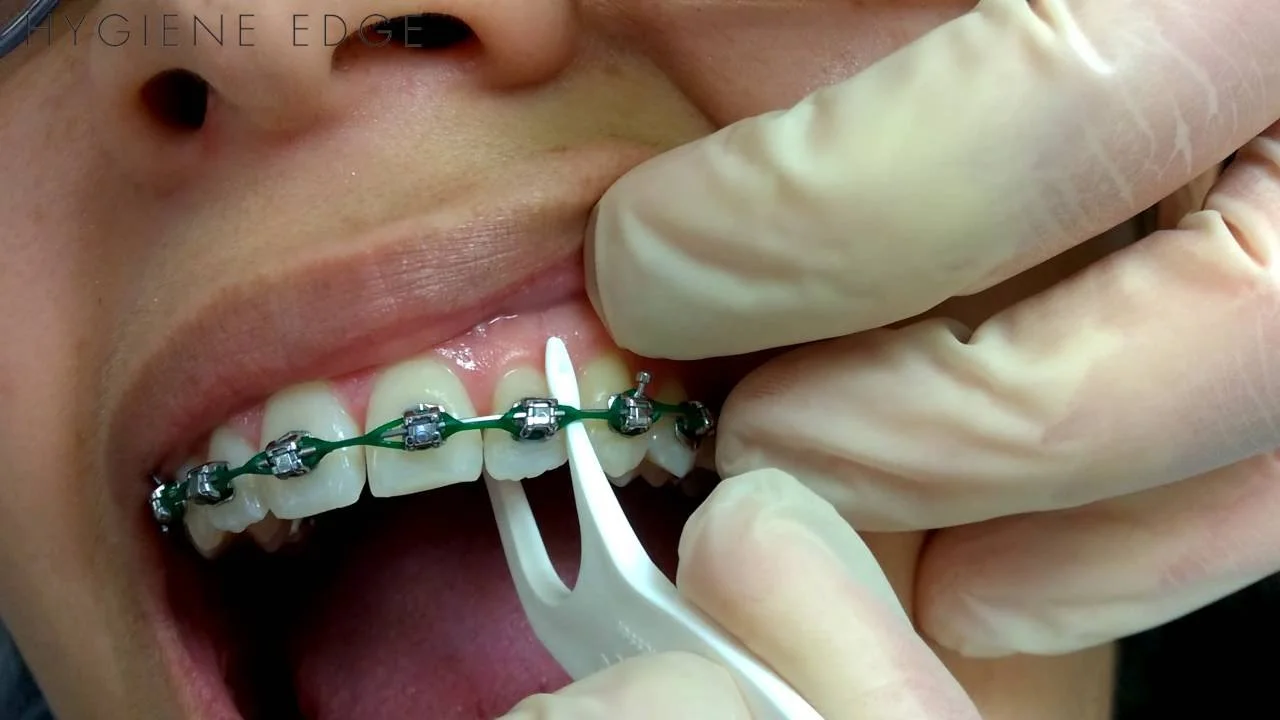
Step-by-step:
Put the flosser between your teeth with the one end passing behind your wire
Snap the floss through the tooth contact
Push it slightly toward one tooth to hug the contour of the tooth better (in a C shape as in #1 above), then use gentle up-and-down motions to thoroughly floss the sides of the teeth
Guide it along the other tooth in the same way and repeat
Snap the floss back out through the tooth contact to remove, move to the next spot, and repeat
3. Newest and effective: Water Flosser (Oral Irrigator)
Instead of threading floss under your wire between every contact, this device has a small tip that shoots a stream of water between the teeth to break up and flush out any debris that a toothbrush couldn’t reach. For costing roughly just $50, this can significantly simplify and expedite your oral hygiene routine with braces.

Step-by-step:
Fill the flosser reservoir with water
Direct the tip between the teeth under the wire (toward the gums-side of the wire) and let the spray flush everything out.
Pass the flosser tip along the gumline toward the next between-the-tooth area. This allows cleaning along the gumline as well, one of the most common spots for plaque accumulation.
Repeat for each tooth contact.
It can get messy with all the water spray! Pro tip: lean over the sink and keep your lips mostly closed as you go from area to area to avoid getting water all over the place.
Common Questions & Troubleshooting
“It takes so long!”
Yes—flossing with braces takes more time than flossing without. But the extra effort pays off in a healthier smile and better final results. Set aside a few extra minutes and make it a routine—just like brushing.
“The floss keeps getting caught on wires/brackets.”
Make sure you’re using waxed floss or dental tape (less likely to snag).
Use the threader carefully and slowly.
If a wire catches, don’t force it—rinse, reposition, and proceed gently.
If you consistently struggle, ask us about an orthodontic flosser or water flosser to supplement your routine.
“My gums bleed a little when I floss.”
A little bleeding may be normal if it’s been a while since you flossed properly – bleeding is a sign of gum inflammation, resulting from debris that hasn’t been cleaned out. Consistency and thoroughness over time will resolve bleeding gums while flossing, and will keep your smile healthy.
“Can I skip flossing if I use a water flosser?”
Flossing is the gold standard, so using floss will yield the best result. However, studies have shown that water flossers can be almost as effective if used properly. Every situation is different, though, sometimes there are special circumstances that would make one more ideal for you than another. Be sure to ask your dentist which would be best for you during your orthodontic treatment.
Final Thoughts & Your Next Step
Flossing with braces may feel a little awkward at first—but with the right tools, technique, and consistency, it quickly becomes manageable. And more importantly, it helps you preserve the beauty, health, and longevity of your smile.

Here are your actionable take-aways:
Choose waxed floss (or dental tape) + a floss threader or orthodontic flosser.
Allocate 10 minutes or so for flossing daily when you have braces.
Use the C-shape motion, get behind the wires, and be consistent.
Add a water flosser if you want to boost your routine.
Reach out if you’re having trouble—we’re here for you in Westfield!
If you’re ready to elevate your smile and are curious about what’s possible, call us today to schedule your free consultation. We’re excited to help you achieve a smile that’s not just straight—but one you never thought possible and can’t wait to show off!